Tuesday, September 24, 2013

AppleScript: getting and setting user data

In the Properties > Note inspector, you can set user data of an object. Each user-data item is a name/value pair. For example, in the image below, the item "oName" of the selected object is set to "drawer," and the item "drawerState" is set to "open."


Using the name of the data item, you can set and retrieve its value in AppleScript. User data is useful when scripting as it's a way of storing values for future use after the script has completed its execution.

Here are two useful methods for getting and setting user-data items of an object. Note that the value set or retrieved is a string.

-- Returns value of user-data item itemName of graphic obj.
-- Returns null if data item doesn't exist, or obj is invalid.

on getUserDataItem(obj, itemName)
   tell application id "OGfl"
      try
         set retval to value of user data item itemName of obj
         -- force evaluation of retval to trigger the error:
         set triggerError to retval 
      on error
         return null
      end try
      return retval
   end tell
end getUserDataItem

-- Sets user-data item itemName of graphic obj to val,
-- adds that user-data item if it doesn't exist.
-- Returns null if obj is an invalid, or value failed to set 
-- (e.g., val isn't a string); else returns passed value.

on setUserDataItem(obj, itemName, val)
   tell application id "OGfl"
      try
         set value of user data item itemName of obj to val
      on error
         return null
      end try
      return val
   end tell
end setUserDataItem

Thursday, July 4, 2013

Adding keyboard shortcuts

Do you find it unusual that OmniGraffle has no keyboard shortcut for Group and Ungroup? So did I. Fortunately, you can add your own through OSX's System Preferences.

Open System Preferences, choose Keyboard, and then choose the Keyboard Shortcuts tab. Then within that tab, choose Application Shortcuts on the left:


The well on the right lists all the applications that you've added keyboard shortcuts to. To make a new one, hit the "+" button below it. A dialog will appear that allows you to define a shortcut.


In the Application dropdown at the top, choose OmniGraffle. Then, in the Menu Title field, type the menu name exactly how it appears in OmniGraffle's menus. And finally, in the Keyboard Shortcut field, type whatever key combo you want to use for that menu. Here I'm assigning Control+G to the command Group:


Once you hit Add, you'll see the shortcut is added to the OmniGraffle list of shortcuts:


When you go back to OmniGraffle, you'll see that the Group menu now has the Control+G shortcut added to it:


Follow the same process for adding Control+Shift+G to Ungroup. You can also use this process to change an existing menu's shortcut.

Wednesday, July 3, 2013

Use Duplicate instead of Copy/Paste

I'm so habituated to using Copy/Paste, but I'm trying to break that habit and use OmniGraffle's Duplicate command instead. The shortcut is Command+D.

It's one key-combo instead of two, but more importantly, it doesn't wipe out whatever you have on your clipboard.

And like Copy/Paste, it has a hidden feature. Let's say you duplicate an object, and then you move the duplicate directly below the original, leaving 20 pixels between the two objects. OmniGraffle will remember the duplicate's offset from the original, so when you duplicate that duplicate, its own duplicate will appear 20 pixels below it, and so on. After moving the first duplicate to where you want it, just hit Control-D over and over to create an equidistant row or stack of objects.

One shortcoming: there's no ability to duplicate an object such that the new object lands exactly on top of the old one. The duplicated object lands down and over from the original. Copy has a corresponding Paste in Place command which pastes the new object exactly on top of the copied one, but there is no Duplicate in Place option.

Not that it's hard to press Up-arrow + Left-arrow, but down and over is an inconvenient starting point when the intended offset is either directly below or directly to the right.

A powerful inspector: Canvas with Grid and Alignment open

Okay, enough of this AppleScripting for now. Back to the basics.

This is my goto inspector. I use it more than any other, and for laying objects out, it's indispensable. It's the Canvas inspector with Grid and Alignment locked open. (Double-clicking an inspector tab locks it open, allowing you to have multiple tabs open at once. Locked tabs are signified by the small green lock icon.)


In this post, I'll assume your units are set to pixels (unless otherwise specified), but the concepts are the same when set to any unit.

Canvas > Grid

First, if you are not snapping to a grid when drawing and arranging objects, start doing so. With snap-to-grid on and a grid spacing greater of 2 or more, if two objects look aligned, they are aligned. Also, it avoids having to put screen locations like "10.384 , 30.76" in your redlines. (I kid, but those long decimals drive me nuts.)

Speaking of that, a way to get rid of all of those messy fractional locations/dimensions in one fell swoop is this: select all objects, turn snap-to-grid on, set major and minor grid spacing to 1, and press the Align To Grid button. 

It's handy to have the Canvas > Grid Inspector always available. Usually I start with a grid spacing of 5 because it makes moving the selected object with the arrow keys reasonably fast and it's good for creating an initial layout. But when I'm especially impatient when moving an object a long distance with the arrow keys, I'll bump it up to 10 or 20. And when I'm refining the layout, I drop it down to 1.

Major and Minor grids

The minor grid steps setting for me is set to 1 for wireframes. Minor grid steps divides your major grid spacing by its value, so if your major grid spacing is 100 and your your minor grid spacing is 10, it creates a grid that is spaced 10 pixels apart. It's almost identical to having major grid spacing set to 10 and minor grid steps set to 1. 

I say "almost" because it's different if you are actually displaying the grid. If you turn Show Grid Lines on and then turn on Show Major, in the scenario above you'll see the major grid lines 100 pixels apart, and the minor grid lines 10 apart. The two types of grid lines are distinguished by the color chosen in the color wells next to them.

An example of where this is useful is designing a woodworking project, a task OmniGraffle is ideally suited for. Set your units to inches, your major grid spacing to 1, and your minor grid steps to 8. Then you'll get a grid displaying inches and eighths of inches, and objects snapping to every eighth-inch. And if you suddenly need sixteenths of an inch, change minor grid steps to 16.

Canvas > Alignment

I won't go into the alignment control (for aligning selected objects by their tops, centers, lefts, etc.) since that's pretty self-evident. But two sets of spacing controls are pretty useful, and behave completely differently.

First off, the layout of the Canvas > Alignment Inspector is confusing. The number fields between the two horizontal-spacing buttons and two vertical-spacing buttons have nothing to do with the buttons to the left of the fields; they affect only the buttons to the right of the fields.

The Spread-Evenly buttons

These buttons - to the left of the number fields - evenly distribute a set of selected objects between the leftmost (or topmost) selected object, and the rightmost (or bottommost) selected object. 

I don't use these buttons for wire-framing because the objects in the middle will likely have fractional values in their location properties. Instead I use the buttons to the right of the number fields.

The Offset-Horizontally/Vertically buttons

These buttons - to the right of the number fields - take the value in the field to their left and place that many pixels between each of the selected objects, distributing them horizontally or vertically starting with the leftmost (or topmost) object. The top button does horizontal spacing, and the bottom button does vertical spacing. This is useful when mocking up, say, a row of albums on a music site, or a list of social-network friends in a friends list.

The Create Shape commands

Note that these number fields in the Canvas > Alignment inspector have a secondary purpose - they affect the Create Shape Left, Create Shape Right, Create Shape Top, and Create Shape Bottom commands (located under Edit > Mouseless Editing, though you'll learn the shortcut keys rather than accessing them through menus).

These handy commands take the selected shape or group and create a duplicate of it a certain distance to the left, right, top, or bottom of the original. The keyboard shortcut is Command+Option+[any arrow key]. 

The horizontal distance between the original and the duplicate (for the Left/Right versions of this command) is determined by the top number field in this inspector, and the vertical distance between the original and the duplicate (for the Top/Bottom versions of this command) is determined by the bottom field in this inspector.

Monday, July 1, 2013

Applescript to draw a taxonomy from a JSON source.

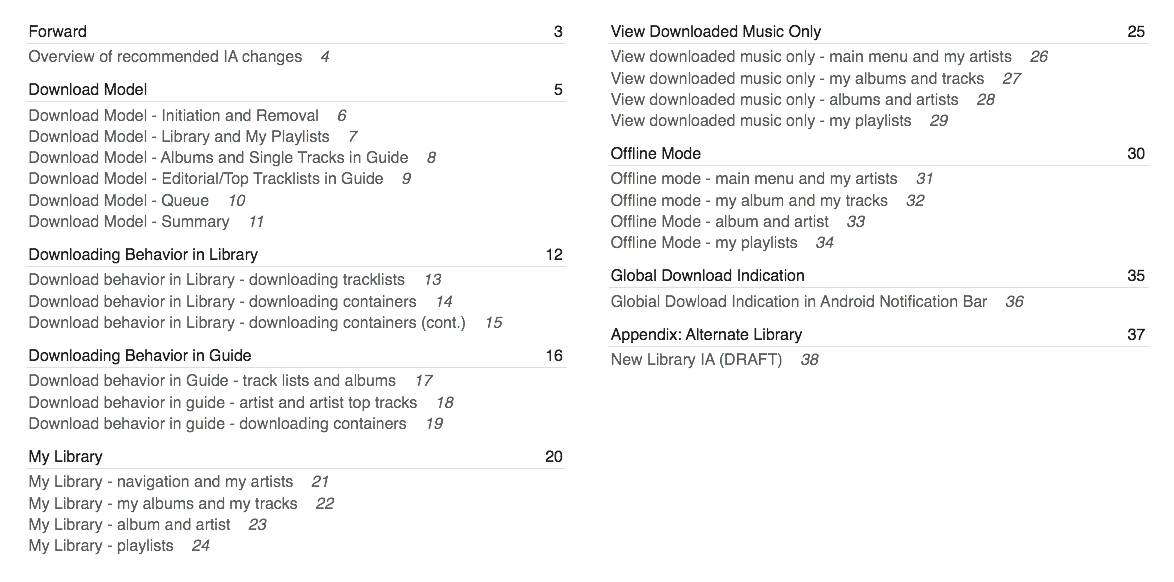
This script outputs the exact same chart as the one in another post, but it takes a JSON source instead of the outline source. This is useful only if you have an automated way to create JSON. If you plan to hand-type it, you'd be better off with the script in this other post instead.

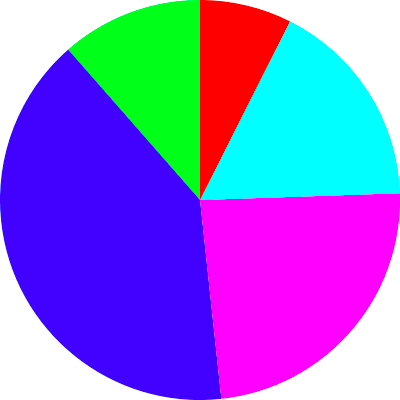
Here is sample output from this script. You can customize the appearance by changing the properties at the top of the script that start with "SETTINGS_":


The script expects a JSON file where each JSON object represents a node. Each object has (up to) two properties: "itemName" which is the label of the node, and (if the node has children)  "itemChildren" which contains the children of the node. Child nodes can have children of their own.

The script expects the file to be on your Desktop, and by default it needs to be named "drawtree.json" but you can change that in the settings at the top of the script.\

Here is the JSON that produces the chart above:

[
  {
    "itemName": "Rock/Pop",
    "itemChildren":
        [
      {"itemName": "Roots",
        "itemChildren":
        [
          {"itemName": "Cajun/Zydeco"},
          {"itemName": "Tex Mex"},
          {"itemName": "Swamp Pop"}
        ]
      },
      {"itemName": "Singer-Songwriter"},
      {"itemName": "Classic Rock",
        "itemChildren":
        [
          {"itemName": "AOR"}
        ]
      },
      {"itemName": "Art & Progressive Rock",
        "itemChildren":
        [
          {"itemName": "Rock Opera"},
          {"itemName": "New Prog"},
          {"itemName": "Krautrock"}
        ]
      },
      {"itemName": "Blues & Boogie Rock",
        "itemChildren":
        [
          {"itemName": "Boogie Rock"},
          {"itemName": "Southern Rock"}
        ]
      },
      {"itemName": "Glam"},
      {"itemName": "Hard Rock",
        "itemChildren":
        [
          {"itemName": "Post-Grunge"},
          {"itemName": "Instrumental Guitar Rock"},
          {"itemName": "Acid Rock"}
        ]
      },
      {"itemName": "Instrumental Rock"},
      {"itemName": "Pop",
        "itemChildren":
        [
          {"itemName": "Dance Pop"},
          {"itemName": "Teen Beat"},
          {"itemName": "Teen Idols"}
        ]
      },
      {"itemName": "Jam Rock"},
      {"itemName": "Latin Pop"},
      {"itemName": "Country Rock"},
      {"itemName": "Funk Rock"},
      {"itemName": "Metal",
        "itemChildren":
        [
          {"itemName": "Progressive Metal"},
          {"itemName": "Thrash/Speed Metal"},
          {"itemName": "Stoner Rock"},
          {"itemName": "Grindcore"},
          {"itemName": "Doom Metal"},
          {"itemName": "Pop Metal"},
          {"itemName": "New Wave of British Heavy Metal"},
          {"itemName": "Black Metal"},
          {"itemName": "Death Metal"},
          {"itemName": "Funk Metal"},
          {"itemName": "Industrial Metal"},
          {"itemName": "Christian Metal"},
          {"itemName": "Rapcore"},
          {"itemName": "Alt Metal"},
          {"itemName": "Metalcore"}
        ]
      },
      {"itemName": "Folk-Rock",
        "itemChildren":
        [
          {"itemName": "Political Rock"},
          {"itemName": "Celtic Rock"}
        ]
      },
      {"itemName": "Adult Alternative"},
      {"itemName": "Adult Contemporary",
        "itemChildren":
        [
          {"itemName": "Blue-Eyed Soul"},
          {"itemName": "Modern Folk"},
          {"itemName": "Lite Rock"},
          {"itemName": "Jazz Rock"}
        ]
      }
    ]
  }
]

IMPORTANT: this script requires the application "JSON Helper." This application is free in the Apple App Store, available under the Apple menu. (Search for "helper" and it's one of the first results.)

Script after the jump:

Sunday, June 23, 2013

AppleScript to create a taxonomy chart

Update: 6/29/2013. Rewrote script. Now it places the outline into a hierarchical structure before it draws the tree.

Also, I've posted a script that produces the exact same output, but using a JSON source rather than an outline.

-----

Unlike most flow charts, taxonomy charts have a purely hierarchical structure. This script creates such a chart.

Below is a taxonomy of the genre Rock/Pop (according to the music service Rhapsody) created by this script.


Although it would have been nice (and would have made the scripting much simpler) to have used OmniOutliner to provide the data for this chart, I didn't want to spend the $30 it costs, and I figured most people who use OmniGraffle don't have OmniOutliner. 

Instead, the data is drawn from a file placed on your desktop. By default, this file is called drawtree.txt, but you can change that in the SETTINGS properties at the top of the script.

The text in that file to create the chart above:

o Rock/Pop
oo Roots
ooo Cajun/Zydeco
ooo Tex Mex
ooo Swamp Pop
oo Classic Rock
ooo Adult Oriented Rock
oo Art & Progressive Rock
ooo Rock Opera
ooo New Prog
ooo Krautrock
oo Blues & Boogie Rock
ooo Boogie Rock
ooo Southern Rock
oo Glam
oo Hard Rock
ooo Post-Grunge
ooo Instrumental Guitar Rock
ooo Acid Rock
oo Instrumental Rock
oo Pop
ooo Dance Pop
ooo Teen Beat
ooo Teen Idols
oo Jam Rock
oo Latin Pop
oo Country Rock
oo Funk Rock
oo Metal
ooo Progressive Metal
ooo Thrash/Speed Metal
ooo Stoner Rock
ooo Doom Metal
ooo Pop Metal
ooo New Wave of British Heavy Metal
ooo Black Metal
ooo Death Metal
ooo Funk Metal
ooo Industrial Metal
ooo Christian Metal
ooo Rapcore
ooo Alt Metal
ooo Metalcore
oo Folk-Rock
ooo Political Rock
ooo Celtic Rock
oo Adult Alternative
oo Adult Contemporary
ooo Blue-Eyed Soul
ooo Modern Folk
ooo Lite Rock
ooo Jazz Rock

The hierarchy level of each item is indicated by the length of the string proceeding it. I'm using the letter "o" to create this string; any letter will work. It must be string of letters, however, and not - say - a string of asterisks. (I'm using the AppleScript keyword "word" to grab that first string; only a string of letters is considered a word.) A single "o" is the top level, "oo" is the next level down, etc.

Note: there must be a space between the string of o's and the label following it. Also, children directly follow their parent in this list. If you compare the list above to the chart above, you'll get the gist of it.

There are customizable options at the top of this script. These all start with the prefix "SETTINGS_".

Note that this script doesn't do a whole lot of error checking. If there's a problem with the text (e.g., no space between the string of o's and the label, skipping a hierarchy level, etc.), the script will probably fail. I've tested this on several large charts with no error, so if the script errors out, verify your data.

If you've verified your data and there's still a problem, leave your data in a comment here and I'll investigate.

The script follows the jump. Copy it, paste it into AppleScript Editor, and run it.

Sunday, June 2, 2013

Script to generate a table of contents. Supports long documents.

There are a few great scripts out there that automatically create a table of contents for your OmniGraffle document.

This script does as well, but it will spread the table of contents over multiple pages if necessary, and it will also list section headers if you have canvases within your document that serve as section header pages.

It's also extremely customizable.You can pretty much make it look exactly like you want it to look, and you have precise control over almost every aspect of it by changing the properties listed at the top of the script that start with the prefix "SETTINGS_".

Here is one example of how the table of contents for a document with section headings might look, but again, you can customize it to look any number of ways.


The script currently has these limitations.
  • It does not gracefully support wrapping long canvas names; if a canvas name is so long it wraps, it's not going to look great.
  • Sections (the section header and its child pages) have no way to alter the default widow/orphan control. A section is alway kept together unless its height is greater than the canvas height
If additional table-of-content pages are required due to the document being too long to display the TOC on a single canvas, additional canvases will be created to accommodate additional TOC pages. Note: these will be placed at the front of the document and you will have to move them manually due to a bug in OmniGraffle's AppleScript implementation related to moving canvases. (That bug is explained in a post here.)

The script is after the jump. Copy it and paste it into AppleScript editor and run it.

I'm hoping the comments in the script are sufficient to describe the various customizable options. If you have any questions or find any bugs, or you want any new features, please leave a comment.

Omnigraffle AppleScript bug: moving a canvas removes all shared layers on that canvas

Just so you AppleScripters out there are aware, this bug exists in OmniGraffle's AppleScript implementation as of version 5.4.2.

Moving a canvas through AppleScript to the beginning or end of the canvas list removes all shared layers of the moved canvas, even shared layers that are the last instance of that layer.

For example, the following script will remove all shared layers from the second canvas when it is moved to the front of the document.

-- warning: running this script will remove shared layers
tell application id "OGfl"
    tell document of front window
        set c to item 2 of canvases
        move c to beginning of canvases
    end tell
end tell

Also, if any of the shared layers is the last instance of that shared layer, you won't be able to get it back (other than using Undo).

The folks at Omni Group have added this to their bug database.

Thursday, May 23, 2013

Drawing a pie chart with Adjustable Wedge using AppleScript

OmniGraffle has a set of built-in tools and shapes that you can reference by name in AppleScript. Some of these have special AppleScript access. These blessed shapes are Adjustable Wedge, Adjustable Arc, Adjustable Star, Adjustable Arrow, and Adjustable Double Arrow. (See Shapes in OmniGraffle's AppleScript Dictionary.)

Here I'll be focusing on the Adjustable Wedge, which is not in the Tools toolbar, but you can find it in the Common stencil under "Shapes."

Adjustable Wedge turns out to be very easy to manipulate, as it has the properties startAngle and endAngle for adjusting the outer arc, each of which goes from 0 to 360. If Adjustable Wedge were a clock, 0 would be 12 o'clock, 90 would be 3 o'clock, 270 would be 9 o'clock, and so on. (Adjustable Arc has the same properties.)

This makes creating a pie chart a piece of cake, as you just take the percentage of the chart that a piece of data would occupy, multiply it by 360, and that is the span of the arc. No trigonometry needed for calculating x,y postions on the arc. Adjustable Wedge handles that for you.

The code below creates this pie chart:


Previous AppleScript posts on this blog explain much of what is going on in the following script. I'll call out various lines of interest below it. Here are all posts about AppleScript on this blog.

-----

-- Copyright © 2013, Joseph Brick
-- All rights reserved. 
-- Redistribution, with or without modification, is permitted provided that the copyright notice is retained.

tell application id "OGfl"

    -- stuff the script user might want ot adjust
    set pieLoc to {50, 50}
    set pieDiameter to 400
    set wedgeValues to {24, 55, 77, 130, 37} -- values or percentages; doesn't matter
    set wedgeColors to {{1, 0, 0}, {0, 1, 1}, {1, 0, 1}, {0, 0, 1}, {0, 1, 0}} -- same length as wedgeValues
    set wedgeStartAngle to 0 -- angle at which first wedge starts drawing (0 is 12 o'clock, 180 is 6 o'clock)
   
    -- get the sum of all wedge values
    set sumOfWedgeValues to 0
    repeat with wedgeValue in wedgeValues
        set sumOfWedgeValues to sumOfWedgeValues + wedgeValue
    end repeat

    set wedges to {}  -- initialize list of wedge shapes to an empty list

   --draw one wedge per loop
    repeat with i from 1 to count of wedgeValues
        set wedgeDegrees to ((item i of wedgeValues) / sumOfWedgeValues) * 360  
        set wedgeEndAngle to wedgeStartAngle + wedgeDegrees

        tell canvas of  front window
            set wedge to make new shape at end of graphics with properties {name:"AdjustableWedge", size:{pieDiameter, pieDiameter}, origin:pieLoc, startAngle:wedgeStartAngle, endAngle:wedgeEndAngle, draws shadow:false, draws stroke:false, fill color:item i of wedgeColors}
        end tell

        set end of wedges to wedge  -- add wedge to list of wedges
        set wedgeStartAngle to wedgeEndAngle    -- start next wedge where this wedge ended
    end repeat
    assemble wedges -- group wedges
end tell

-----

repeat with i from 1 to count of wedgeValues

This is yet another form of the repeat loop. The value of variable i increases by 1 on each run through the loop, starting at 1, and ending at the number of items in the variable wedgeValues.

make new shape

This command draws each wedge. The easy way to find out how to make a given shape in AppleScript is to select that shape in OmniGraffle, and choose Edit > Copy As > AppleScript. This puts AppleScript on the clipboard that will draw this object or objects. Then it's just a matter of using variables for various properties instead of hard-coded values.

set end of wedges to wedge

It may seem counterintuitive, but setting the beginning or end of a list to something appends that something to that list. Here we are adding the latest Adjustable Wedge object we created (held by the variable wedge), and appending it to the list wedges, which we initialized as an empty list before the loop.

assemble wedges

The command assemble groups a list of objects. The variable wedges contains all of the wedges we drew. 

Tuesday, May 21, 2013

Changing the canvas size of all canvases with AppleScript

***
Update (07/20/2013): a new version of this script that prompts for the new canvas size (rather than changing the variable in the script) appears after the jump.
***

Here's another useful AppleScript script for changing all canvases in your document to a given size.

First, some important notes about page size vs. canvas size:

Changing your canvas size does not change your page size, which is defined in Page Setup as the paper size you print to. You can have multiple pages on a canvas, and you will if you set the canvas size larger than the paper size from Page Setup

Also, the variables <%#%> (page number) and <%TotalPages%> report their values based on number of pages in the document, not the number canvases. However, if you check the "Print canvas on one printer sheet" checkbox in the Canvas > Size inspector, then these variables consider a multi-page canvas a single page.

So if you are manually setting the canvas size this script does, and you only want one page per canvas, you'll want to do two things:
  1. Make sure that the paper size that you choose in Page Setup is larger than the canvas size you pick. Pick or create a humungous paper size in Page Setup, just to be safe. 
  2. If you plan to print and want the printer to ignore the page size set in Page Setup, export to a PDF document first. Note: do NOT print to PDF, but instead go to File > Export and chose PDF document. All resulting pages in the PDF will be sized to your canvas size (assuming you followed step 1 above). Open the PDF in Preview. Preview will automatically set the zoom to fit the paper size you select in its print dialog,
With those disclaimers out of the way, on to the script:


-- Copyright © 2013, Joseph Brick
-- All rights reserved. 
-- Redistribution, with or without modification, is permitted provided that the copyright notice is retained.

set theSize to {480, 800}
tell application id "OGfl"
    tell the front document
        set allCanvases to canvases
        repeat with currentCanvas in allCanvases
            tell currentCanvas
                set adjusts pages to false --prevents creating a new page in a canvas by accidentally dragging an object beyond the paper size
                set canvasSize to theSize
            end tell
        end repeat
    end tell
end tell

A few notes on this script are below. See the post "Using AppleScript to reposition objects" for more details on using AppleScript.

-----

tell the front document / end tell

Instead of using this tell / end tell structure, we could have done the following:

    set allCanvases to canvases of the front document 

Since each canvas in allCanvases will now include a reference to the document that contains it, we don't need to refer explicitly to the document when looping through the canvases.

set theSize to {480, 800}

This variable contains the size we'll set each canvas to. This is always a pixel size, regardless of which units are set in each canvas. So if you want the size to be in a different unit, you'll have to do the conversion to pixels.

For example, if you want a 10-inch by 10-inch canvas, you could do something like this:

     set conversionMultiplier to 72
     set theSize to {10 * conversionMulitplier, 10 * conversionMultiplier}

To find the conversion multiplier from pixels to any unit, set a canvas to use the desired units in the Canvas > Size Inspector, then set the Major Grid Spacing to 1 (of those units) in the Canvas > Grid Inspector, and then (temporarily) change the canvas units to pixels. The setting in Major Grid Spacing will change to the number of pixels that make up 1 unit of the desired units.

tell currentCanvas / end tell

Instead of using this tell end tell structure, we could have put "of currentCanvas" after the properties in each of the set commands within the repeat loop. E.g.,

     set canvasSize of currentCanvas to theSize

-----

Note: the purple items in the script are class properties.

To get details on all the properties that OmniGraffle classes like document and canvas contain, open AppleScript Editor, choose File > Open Dictionary, and choose "OmniGraffle Professional 5" from the ensuing dialog. This brings up documentation on everything that OmniGraffle's AppleScript implementation supports.