Also, every image is contained by a shape. For example, when you paste a bitmap into Omnigraffle, that image arrives contained by a rectangle shape that has no fill or stroke.
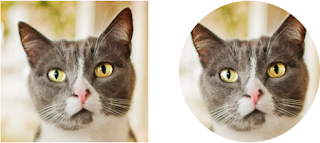
Here we'll assign a pasted bitmap (sitting in its default rectangle shape) to a different shape: in this case, a circular shape.

An easy way to assign an image (or any property) of one shape to a different shape is to use the Style Tray. At the bottom of the document window, you see this tray containing style "chits" for the selected object. In this case, the selected object is the rectangular cat image we pasted.

The chit that's off by itself on the left represents all of the styles of pasted bitmap, including the rectangle shape that contains it. Each of the other chits represents individual properties of that shape. From left to right, these properties are: Fill, Stroke, Image, Shadow, Shape, Font, and Text Position.
To assign any of these properties from the selected object to another object, just drag the chit containing the desired property from the Style Tray to the target object. So to assign the image of the (selected) pasted bitmap to the circle shape, grab its Image chit from the Style Tray and drag it onto the circle. (You can then delete the object you pasted.)
An alternative is to go the opposite direction: assign a circle shape to the the pasted image. To do this, you'd select a circle with no image, and from the Style Tray drag the Shape chit onto the pasted bitmap.
You could also assign a circle shape to the pasted image in the Lines and Shapes Inspector:
Either way, once an object contains an image, you can adjust how it displays within the object using the Image Inspector.

The icons to the top-right of the preview image determine how the image displays in the shape. From left to right, these are Natural Size, Stretch to Fit (the default, shown selected above), and Tiled.
If you want control over the top and left offsets of the image within the shape, as well as the relative size of the image within the shape, choose Natural Size, the leftmost icon.
With Natural Size chosen, use the two offset fields to the right of the preview image to determine how far from the left and top of the shape the image displays, and use the Scale slider directly below the preview image to determine how large or small you want the image relative to the size of the shape. Scaling up an image essentially crops it within the shape.
You can also drag the preview image around in the inspector to change its offsets, but you don't get a lot of accuracy that way.
Note: with Natural Size selected, each time you resize the shape you'll likely have to readjust the offset and zoom settings, so it's best to get the shape to the desired size before you bother to make these adjustments.