Thursday, May 23, 2013

Drawing a pie chart with Adjustable Wedge using AppleScript

OmniGraffle has a set of built-in tools and shapes that you can reference by name in AppleScript. Some of these have special AppleScript access. These blessed shapes are Adjustable Wedge, Adjustable Arc, Adjustable Star, Adjustable Arrow, and Adjustable Double Arrow. (See Shapes in OmniGraffle's AppleScript Dictionary.)

Here I'll be focusing on the Adjustable Wedge, which is not in the Tools toolbar, but you can find it in the Common stencil under "Shapes."

Adjustable Wedge turns out to be very easy to manipulate, as it has the properties startAngle and endAngle for adjusting the outer arc, each of which goes from 0 to 360. If Adjustable Wedge were a clock, 0 would be 12 o'clock, 90 would be 3 o'clock, 270 would be 9 o'clock, and so on. (Adjustable Arc has the same properties.)

This makes creating a pie chart a piece of cake, as you just take the percentage of the chart that a piece of data would occupy, multiply it by 360, and that is the span of the arc. No trigonometry needed for calculating x,y postions on the arc. Adjustable Wedge handles that for you.

The code below creates this pie chart:


Previous AppleScript posts on this blog explain much of what is going on in the following script. I'll call out various lines of interest below it. Here are all posts about AppleScript on this blog.

-----

-- Copyright © 2013, Joseph Brick
-- All rights reserved. 
-- Redistribution, with or without modification, is permitted provided that the copyright notice is retained.

tell application id "OGfl"

    -- stuff the script user might want ot adjust
    set pieLoc to {50, 50}
    set pieDiameter to 400
    set wedgeValues to {24, 55, 77, 130, 37} -- values or percentages; doesn't matter
    set wedgeColors to {{1, 0, 0}, {0, 1, 1}, {1, 0, 1}, {0, 0, 1}, {0, 1, 0}} -- same length as wedgeValues
    set wedgeStartAngle to 0 -- angle at which first wedge starts drawing (0 is 12 o'clock, 180 is 6 o'clock)
   
    -- get the sum of all wedge values
    set sumOfWedgeValues to 0
    repeat with wedgeValue in wedgeValues
        set sumOfWedgeValues to sumOfWedgeValues + wedgeValue
    end repeat

    set wedges to {}  -- initialize list of wedge shapes to an empty list

   --draw one wedge per loop
    repeat with i from 1 to count of wedgeValues
        set wedgeDegrees to ((item i of wedgeValues) / sumOfWedgeValues) * 360  
        set wedgeEndAngle to wedgeStartAngle + wedgeDegrees

        tell canvas of  front window
            set wedge to make new shape at end of graphics with properties {name:"AdjustableWedge", size:{pieDiameter, pieDiameter}, origin:pieLoc, startAngle:wedgeStartAngle, endAngle:wedgeEndAngle, draws shadow:false, draws stroke:false, fill color:item i of wedgeColors}
        end tell

        set end of wedges to wedge  -- add wedge to list of wedges
        set wedgeStartAngle to wedgeEndAngle    -- start next wedge where this wedge ended
    end repeat
    assemble wedges -- group wedges
end tell

-----

repeat with i from 1 to count of wedgeValues

This is yet another form of the repeat loop. The value of variable i increases by 1 on each run through the loop, starting at 1, and ending at the number of items in the variable wedgeValues.

make new shape

This command draws each wedge. The easy way to find out how to make a given shape in AppleScript is to select that shape in OmniGraffle, and choose Edit > Copy As > AppleScript. This puts AppleScript on the clipboard that will draw this object or objects. Then it's just a matter of using variables for various properties instead of hard-coded values.

set end of wedges to wedge

It may seem counterintuitive, but setting the beginning or end of a list to something appends that something to that list. Here we are adding the latest Adjustable Wedge object we created (held by the variable wedge), and appending it to the list wedges, which we initialized as an empty list before the loop.

assemble wedges

The command assemble groups a list of objects. The variable wedges contains all of the wedges we drew. 

Tuesday, May 21, 2013

Changing the canvas size of all canvases with AppleScript

***
Update (07/20/2013): a new version of this script that prompts for the new canvas size (rather than changing the variable in the script) appears after the jump.
***

Here's another useful AppleScript script for changing all canvases in your document to a given size.

First, some important notes about page size vs. canvas size:

Changing your canvas size does not change your page size, which is defined in Page Setup as the paper size you print to. You can have multiple pages on a canvas, and you will if you set the canvas size larger than the paper size from Page Setup

Also, the variables <%#%> (page number) and <%TotalPages%> report their values based on number of pages in the document, not the number canvases. However, if you check the "Print canvas on one printer sheet" checkbox in the Canvas > Size inspector, then these variables consider a multi-page canvas a single page.

So if you are manually setting the canvas size this script does, and you only want one page per canvas, you'll want to do two things:
  1. Make sure that the paper size that you choose in Page Setup is larger than the canvas size you pick. Pick or create a humungous paper size in Page Setup, just to be safe. 
  2. If you plan to print and want the printer to ignore the page size set in Page Setup, export to a PDF document first. Note: do NOT print to PDF, but instead go to File > Export and chose PDF document. All resulting pages in the PDF will be sized to your canvas size (assuming you followed step 1 above). Open the PDF in Preview. Preview will automatically set the zoom to fit the paper size you select in its print dialog,
With those disclaimers out of the way, on to the script:


-- Copyright © 2013, Joseph Brick
-- All rights reserved. 
-- Redistribution, with or without modification, is permitted provided that the copyright notice is retained.

set theSize to {480, 800}
tell application id "OGfl"
    tell the front document
        set allCanvases to canvases
        repeat with currentCanvas in allCanvases
            tell currentCanvas
                set adjusts pages to false --prevents creating a new page in a canvas by accidentally dragging an object beyond the paper size
                set canvasSize to theSize
            end tell
        end repeat
    end tell
end tell

A few notes on this script are below. See the post "Using AppleScript to reposition objects" for more details on using AppleScript.

-----

tell the front document / end tell

Instead of using this tell / end tell structure, we could have done the following:

    set allCanvases to canvases of the front document 

Since each canvas in allCanvases will now include a reference to the document that contains it, we don't need to refer explicitly to the document when looping through the canvases.

set theSize to {480, 800}

This variable contains the size we'll set each canvas to. This is always a pixel size, regardless of which units are set in each canvas. So if you want the size to be in a different unit, you'll have to do the conversion to pixels.

For example, if you want a 10-inch by 10-inch canvas, you could do something like this:

     set conversionMultiplier to 72
     set theSize to {10 * conversionMulitplier, 10 * conversionMultiplier}

To find the conversion multiplier from pixels to any unit, set a canvas to use the desired units in the Canvas > Size Inspector, then set the Major Grid Spacing to 1 (of those units) in the Canvas > Grid Inspector, and then (temporarily) change the canvas units to pixels. The setting in Major Grid Spacing will change to the number of pixels that make up 1 unit of the desired units.

tell currentCanvas / end tell

Instead of using this tell end tell structure, we could have put "of currentCanvas" after the properties in each of the set commands within the repeat loop. E.g.,

     set canvasSize of currentCanvas to theSize

-----

Note: the purple items in the script are class properties.

To get details on all the properties that OmniGraffle classes like document and canvas contain, open AppleScript Editor, choose File > Open Dictionary, and choose "OmniGraffle Professional 5" from the ensuing dialog. This brings up documentation on everything that OmniGraffle's AppleScript implementation supports.


Monday, May 20, 2013

Using Applescript to reposition objects

***
Update (07/20/2013): a new version of this script that prompts for the horizontal and vertical offsets  (rather than having to edit the script) appears after the jump.

***

Omnigraffle gives quite a bit of access to AppleScript for automating just about anything you can do by hand. To execute AppleScript, open the AppleScript editor, create a script in it, and run it.

The following example shows you how to reposition all objects in your document by a certain horizontal/vertical offset - in this case, 20 pixels up, and 20 pixels to the left.

While you may have no need for this particular functionality, the code below shows a general technique for accessing each canvas, each layer within a canvas, and each object on a layer. For instance, you might want to change all canvases in your document to a different size, so knowing how to walk through all canvases in a document is a good starting point.

Here is the Applescript code, and below I'll call out various lines to explain them. This post assumes that you have some familiarity with programming concepts such as variables, loops, classes, etc., but does not assume knowledge of AppleScript in particular.

Notes on the colors below:
  • Green items are variables
  • Blue italicized items are classes
  • Blue bolded items are commands particular to OmniGraffle
  • Black bolded items are AppleScript keywords
  • Black unbolded items are values
  • Purple, unbolded items are class properties (this script contains none)

-- Copyright © 2013, Joseph Brick
-- All rights reserved. 
-- Redistribution, with or without modification, is permitted provided that the copyright notice is retained.

set theOffset to {-20, -20} as point
tell application id "OGfl"
    set allCanvases to canvases of front document
    repeat with currentCanvas in allCanvases
        set allNonsharedLayers to (layers of currentCanvas where class is not shared layer)
        repeat with currentLayer in allNonsharedLayers
            set allGraphics to graphics of currentLayer
            repeat with currentGraphic in allGraphics
                slide currentGraphic by theOffset
            end repeat
        end repeat
    end repeat
end tell

-----

And now, let's break down this script:

set theOffset to {-20, -20} as point

theOffset is a variable. In Applescript, you don't need to define variables ahead of time; the act of setting one for the first time creates it. theOffset is set to a list of two items. Lists are defined by delimiting a set of values by commas within curly braces.

The variable is defined as an instance of the class point, since that is what the slide command expects. (A point must be a list of two real numbers.) Without specifying the class, however, AppleScript would figure it out, so in most cases you don't need to specify the class.

tell application id "OGfl"

The tell statement here has a corresponding end tell, which is the last line in the script. Everything between those two lines will be directed at Omnigraffle, as opposed to at another application.

set allCanvases to canvases of the front document

canvases returns a list of all canvases in the document. This is placed in the variable allCanvases.

repeat with currentCanvas in allCanvases / end repeat

The repeat with statement creates a loop for each item in a list, and at the start of each loop it places the corresponding list item into a variable. Here we are walking through all canvases in the document.

The list of canvases is held by the variable allCanvases, set above, and the variable that receives the corresponding value at the beginning of each loop is currentCanvas. So at the beginning the first loop, currentCanvas receives the first item of allCanvases; in the second loop, it gets the second item, and so on.

set allNonsharedLayers to (layers of currentCanvas where class is not shared layer)

Note: there is a bug in Omnigraffle's Applescript implementation (as of version 5.4.2) that returns an invalid form of the graphics list for shared layers, so this script is limited to non-shared layers. Sadly, you'll have to move the objects in your shared layers manually, or make a temporary non-shared layer copy.

You can filter a list of items using the keyword where. (The keywords whose and that are synonyms of where.) Here, the variable allNonsharedLayers receives a list of layers in the current canvas, but only the layer objects whose class is not shared layer. Thus, the loop nested within this loop will deal only with non-shared layers.

repeat with currentLayer in allNonsharedLayers

Another repeat with loop, this time looping through all non-shared layers in the current canvas and placing each one in the variable currentLayer.

set allGraphics to graphics of currentLayer

graphics returns a list of Omnigraffle objects regardless of type - in this case, all objects on the layer the current loop is dealing with. You could also use shapes or lines if you need to be more specific.

repeat with currentGraphic in allGraphics

Here's the innermost repeat with loop, this time looping through all graphics in the current layer and placing each one in the variable currentGraphic.

slide currentGraphic by theOffset

The slide command moves a graphic to a new location by a horizontal/vertical offset from its previous location. We previously set theOffset at the top of this script to {-20, -20}, so each item will move 20 to the left, and 20 up.

-----

So where does one find documentation on OmniGraffle's AppleScript implementation?

OmniGraffle is a fairly niche product, and AppleScripting with OmniGraffle is a fairly niche activity, so as you can imagine, there's not a ton of information out there.

But in the AppleScript Editor, you can choose File > Open Dictionary, and then choose OmniGraffle Professional from the ensuing dialog. This will bring up a window showing everything OmniGraffle includes in its AppleScript implementation. You can also Google for examples like this to work from.

If you want to learn how to create objects and groups wholesale in AppleScript, you can select any object in OmniGraffle and from the menu choose Edit > Copy As > AppleScript. This will put on the clipboard AppleScript that will create this object from scratch. 

And of course it helps to be familiar with AppleScript, which is documented very well in the Mac Developer Library.


Sunday, May 19, 2013

Using variables

OmniGraffle has a number of variables related to objects, canvases, and the current document that come in handy. (This is a fixed set of variables; you cannot define your own variables.)

The menu Edit > Insert Variable exposes a number of them, but there are others.


Here I'll describe how they are used and call out some of the more useful ones.

You can put a string representing a variable in any object's text. The variable string is shown when you are editing the object's text, and the variable's value is shown otherwise. Variables are formatted with a preceding "<%" and a terminating "%>". For example, the variable for the current date is entered as <%Date%>.

You can mix variables with static text, and include multiple variables in a single object's text. For example, "Page <%#%> of <%TotalPages%>" could display as "Page 3 of 58" in, say, a page footer. Or, you might put "Last modified by <%Modifier%> on <%ModificationDate%>" on your title page.

In addition to those found in the Insert Variable menu, there are many that are associated with the Data Inspector. Each value here can display in an object's text using a variable.


The field variables above are:
  • <%Copyright%>
  • <%Version%>
  • <%Subject%> 
  • <%Description%>
  • <%Comments%>

The variables associated with the drop-down at the bottom are listed below. If multiple values are entered for a drop-down category, these are delimited by carriage returns when displayed.
  • <%Authors%>
  • <%Organizations%>
  • <%Languages%>
  • <%Keywords%>
  • <%Projects%>

Variables useful in headers, footers, and title pages

If you don't have document templates set up for your standard work documents, you should go about doing that: it's a time saver. In such a template, you can have your predefined headers, footers, and title pages populated with variables, so you never have to touch them; instead, let the variables do the work.
  • <%Canvas%> (name of the current canvas): This serves handily as the page title.
  • <%#%> (current page number)
  • <%TotalPages%> (total number of pages) 
  • <%Subject%> (document title): That's how I use it, anyway. Define in the Data Inspector.
  • <%Projects%> (project code name(s)): Typically, a single value. Define in the Data Inspector.
  • <%Organizations%> (your organization(s) or team name(s)): Typically, a single value. Define in the Data Inspector.
  • <%Creator%> (document author): I assume Omnigraffle is picking this value up from OSX, or perhaps the product registration.
  • <%Authors%> (document author(s)): Typically a single value, and usually you. Define in the Data Inspector if you don't like the value <%Creator%> is returning.
  • <%Version%> (the document version): Define in the Data Inspector.
  • <%ModificationDate%> (the date of your most recent save): I just use this as the document date, rather than showing both creation and modification dates.

Variables useful within the document

<%Length%> can be assigned only to a line label, and suddenly that line becomes useful for documenting other objects' dimensions, since the variable updates as you change the line length:


<%Width%> and <%Height%> are useful for document the dimensions of an object. Put
"<%Width%> by <%Height%>" in an object's text to automatically document your wireframes: 


Friday, May 17, 2013

Masking and cropping images

In OmniGraffle, any shape can contain an image, either raster like BMP or PNG, or vector like PDF or EPS.

Also, every image is contained by a shape. For example, when you paste a bitmap into Omnigraffle, that image arrives contained by a rectangle shape that has no fill or stroke.

Here we'll assign a pasted bitmap (sitting in its default rectangle shape) to a different shape: in this case, a circular shape.


An easy way to assign an image (or any property) of one shape to a different shape is to use the Style Tray. At the bottom of the document window, you see this tray containing style "chits" for the selected object. In this case, the selected object is the rectangular cat image we pasted.


The chit that's off by itself on the left represents all of the styles of pasted bitmap, including the rectangle shape that contains it. Each of the other chits represents individual properties of that shape. From left to right, these properties are: Fill, Stroke, Image, Shadow, Shape, Font, and Text Position. 

To assign any of these properties from the selected object to another object, just drag the chit containing the desired property from the Style Tray to the target object. So to assign the image of the (selected) pasted bitmap to the circle shape, grab its Image chit from the Style Tray and drag it onto the circle. (You can then delete the object you pasted.)

An alternative is to go the opposite direction: assign a circle shape to the the pasted image. To do this, you'd select a circle with no image, and from the Style Tray drag the Shape chit onto the pasted bitmap.

You could also assign a circle shape to the pasted image in the Lines and Shapes Inspector:


Either way, once an object contains an image, you can adjust how it displays within the object using the Image Inspector.


The icons to the top-right of the preview image determine how the image displays in the shape. From left to right, these are Natural Size, Stretch to Fit (the default, shown selected above), and Tiled.

If you want control over the top and left offsets of the image within the shape, as well as the relative size of the image within the shape, choose Natural Size, the leftmost icon. 

With Natural Size chosen, use the two offset fields to the right of the preview image to determine how far from the left and top of the shape the image displays, and use the Scale slider directly below the preview image to determine how large or small you want the image relative to the size of the shape. Scaling up an image essentially crops it within the shape.

You can also drag the preview image around in the inspector to change its offsets, but you don't get a lot of accuracy that way.

Note: with Natural Size selected, each time you resize the shape you'll likely have to readjust the offset and zoom settings, so it's best to get the shape to the desired size before you bother to make these adjustments.

Wednesday, May 15, 2013

Making a click-through HTML or PDF prototype

OmniGraffle allows you to assign actions to objects via the Actions Inspector. A one of the interactions offered is jumping to another canvas on click.

Note that this particular action works when you export to PDF or HTML, so this allows you to make simple prototypes that navigates to different screens when clicking various objects. This works for mobile prototypes as well, though you may need to experiment with various browsers and PDF readers on the device to find the one that works best.

To assign an action, select the object that will trigger navigation, and open the Actions Inspector:


  • In the first drop-down, choose "Jumps Elsewhere"
  • In the second drop-down, make sure "Switch to a Specific Canvas" is chosen
  • In the third drop-down, choose the canvas that you'll jump to upon click
Note that you can test the interaction before exporting to PDF or HTML by selecting the Browse Tool (which looks like a hand with its index finger extended) and clicking on an object.

You can assign actions to any object, but to make these actions easy to find again, I usually put a new layer on top of each canvas called "actions," and place transparent rectangles over objects that I want to react to click.

Once you've assigned actions to the desired objects, export your document to PDF or HTML by choosing the menu File > Export.

For a PDF click-through, set these options in the Export window:


For an HTML click through, set these options in the Export window:


Note that the Scale option is useful if you art targeting a mobile device that is wider or narrower than your prototype.

Tuesday, May 14, 2013

Tips using the Geometry Inspector

The Geometry Inspector provides a good alternative to sizing and positioning objects by hand.

There are a few tips that are helpful when using this inspector:

Like all inspectors that take numeric entries, you can use the up/down arrow keys to increment/decrement the value that has keyboard focus. Shift+Up/Down Arrow increments/decrements that value by 10.

Likewise, the fields accept mathematical expressions. So if you want to half the current width of 250px, just enter 250px/2.

Also, even if the ruler units of your current canvas are set to - say - pixels, you can enter any other unit into the X, Y, Width, and Height fields. (E.g., "2 in")

Holding the Shift key while spinning the Rotation knob sets rotation to the nearest 45 degree increment.

Monday, May 13, 2013

Creating symbols in Omnigraffle

Before Omnigraffle, I used Fireworks for all of my UX wire-framing. I don't miss its clunkiness and its constant crashing. But I do miss its symbols.

A symbol in Fireworks (as in Illustrator) is an object that can have multiple instances in your document. If you change the symbol, every instance of it changes. 

You can see how this would be useful for wire-framing. You might have dozens of instances of, say, a symbol containing an avatar and name that represents a member in a social network:


If you copied an Omnigraffle group for making these member representations, you'd have to update every such group in your document if you now needed to add, say, the member's birthdate.

Creating "symbols" in OmniGraffle


There's a trick in Omnigraffle that lets you accomplish this very thing. (I found this trick on a blog entry by Todd Moy on Viget: he lists some excellent Omnigraffle tips there.) 

In OmniGraffle, you can copy a set of objects "as PDF" (Edit > Copy As > PDF) and then paste that PDF object. And at any time, you can double-click that object to edit the copied objects. Nothing is lost upon this conversion to PDF. After pasting the PDF copy, I always just delete the original.

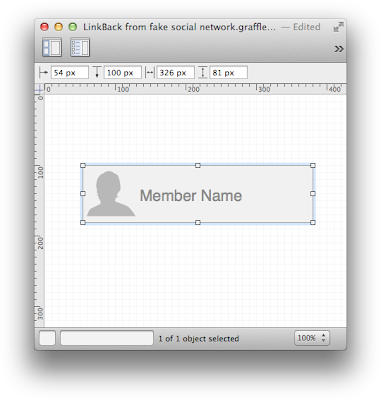
Double-clicking a PDF object brings up a new OmniGraffle window that contains the copied OmniGraffle objects, and this window links back to the PDF instance you double-clicked:


Choosing File > Save in this link-back window after making your edits updates that PDF object.

Here's the powerful part: editing and then saving any copy that you've made of this PDF object updates all other copies of that PDF object in your document. You edit one, and all copies update.

Gotchas


There are a few things you need to be aware of. 

1. This behavior does not extend to other documents. Because of this, don't put a PDF object in a stencil, because when you drag that object from the stencil into your document, it will be seen as a completely separate object, and not just an instance containing same set of objects. Instead use Copy/Paste or Duplicate within the document at hand.
2. The system does not catalog these objects, so once you delete the last instance, it's gone.
3. If you resize the instance, the objects within it don't resize, but because of the resizing, they are shown as stretched or shrunk. This makes it nearly impossible to make pixel-accurate redlines, as the spacing between objects is not accurately measurable - nor are the font sizes.

To overcome (2) above, I make a layer on the last page of my document (where I put my revisions list), and put a copy of each PDF object on that layer. I also make the layer non-printing, just in case I forget to hide it before exporting to a PDF document.

Sunday, May 12, 2013

Union and subtract shapes

Omnigraffle has some useful commands for creating a single object from multiple shapes. This is different from merely grouping objects; with these commands, you end up with a single Omnigraffle object.

For this exercise, we will make this shape resembling a wrench:


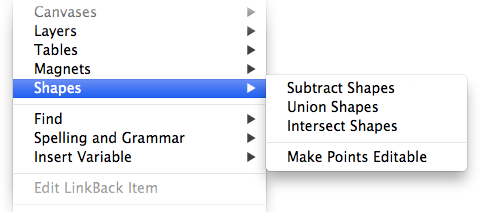
This would be take a bit of time and care to draw using the Omnigraffle vector tools, so instead we'll use two menu commands in the Edit > Shapes menu: Union Shapes and Subtract Shapes.


Start by creating a rectangle and two circles, and lay them out as pictured below, using the Alignment Inspector to be sure that everything is centered horizontally:


Now, select all three shapes, and, choose Edit > Shapes > Union Shapes. This will create a shape that is the union of the three shapes above. It will look like this:


Next we will create the notches in the wrench. Create two rectangles, round their corners using the Corner Radius setting in the Lines and Shapes Inspector, and align them as such over the shape we just created:


Once again, select the three shapes, but this time choose Edit > Shapes > Subtract Shapes. This will take the shapes on top and subtract them from the shape on the bottom, resulting in the wrench we were aiming to create:


Granted, you'll probably never need to create a wrench-shaped object, but once you're familiar with the Subtract Shapes and Union Shapes commands, you'll find yourself using them far more often than you'd expect.

Merging documents with shared layers

To add a canvas from one Omnigraffle document to a different document, you simply drag that canvas from the first document and drop it into the canvas list of the second document.

But some care is needed when shared layers are involved, especially when transferring canvases from differing versions of the same document. You also need to be careful if you are in the habit of using standard shared-layer names in your documents. (E.g, "Background" or "Grid.")

Omnigraffle resolves shared layers in merged files based solely on the names of the shared layers. The destination document's shared layers always win out when confronted with same-named shared layers from another document.

Say you have two documents, A and B, and you are dragging a canvas from A to B.

If the canvas dragged from A has a shared layer whose name does not match that of any shared layer in B, that shared layer will be added to B and remain associated with the canvas.

However, if the canvas dragged from A has a shared-layer name that exists in B, the shared layer from A will not end up in B; instead, the same-named shared layer in B will be assigned to the dropped canvas, replacing the shared layer from A.

So if you want any shared layers to be retained in a canvas dragged from A to B, make sure that B has no conflicting shared-layer names. You can always rename the conflicting shared layer in one document or the other before dragging to avoid the problem.

Saturday, May 11, 2013

Preventing lines from linking to nearby objects as they are drawn or sized

If you are not are using Omnigraffle to make flow charts, using the line tool can be frustrating.

Instead of following your cursor as you draw or resize it, the line will try to latch itself on to any nearby object. This is a useful behavior when creating a flow chart; it's an annoying behavior for creating everything else.

The issue is a property that lines have called "Allow connections to other objects." Omnigraffle lines have this property turned on by default.

So if your line is latching onto other objects, select the troublesome line and open the Connections inspector:


Here, uncheck the "Allow connections to other objects" checkbox. Now the line will not try to latch onto other objects as you size it.

You can also turn this setting off for any new line your draw. See the post "Changing default properties of Omnigraffle objects."

Changing default properties of Omnigraffle objects

When you draw a rectangle, line, or other object in Omnigraffle, it comes with a default set of properties.

For example, out of the box, newly drawn rectangles will have a white fill color, a black stroke color, and Helvetica 13 as their font, among other default settings chosen by the creators of Omnigraffle.

It is likely that these properties are not what you want each time you draw an object with that tool. For example, by default, any rectangle you draw will have a shadow. Unless you are using Omnigraffle to create flow charts, you probably don't want a shadow on every rectangle you draw.

But changing the way newly drawn objects appear is easy and well worth doing. I'll go through two methods here:

Method 1: Use the tool's Inspect Style menu


First, select the tool whose default settings you want to change in the toolbar. Here we want to change the settings for the rectangle within the Shape tool:


Once selected, long-click on that tool (or, hit the tiny dropdown arrow at the bottom of the tool). This will open a menu:


Verify that the tool you want to change is checked in the menu, and then choose Inspect Style from that menu. 


You'll notice that after you select Inspect Style, the tool will display a blue background:


As long as this background is blue, each property you set using the Inspectors changes the default settings for that particular tool. (Note: the icon may have a smaller, dark-blue "i" icon on top of it. That doesn't matter. The key is that the background behind the icon is blue.)

Once you are done setting all the properties that this tool should assign to objects it draws, click another tool in the toolbar. This will exit the tool-changing mode, and each new object you draw with the changed tool will receive the properties you set.

Method 2: Use the Style Tray


The Style Tray lives at the bottom of the document screen and iconically displays various properties of the selected object. Here it is when a rectangle is selected:


You can drag these style icons - which the Omnigraffle folks call "style chits" - from the Style Tray onto another object. This assigns various properties of the selected object to that other object. (See the post Masking and cropping images for more details on using the the Style Tray.)

You can also drag these chits onto the selected tool in the toolbar at the top of the screen to assign the selected object's properties to the tool's default properties.

So, to change the default properties of a tool using the Style Tray:
  1. Select the tool you want to change and draw an object using it.
  2. Set all of the properties of the newly drawn object to the desired settings.
  3. With the modified object selected, drag the left-most chit from the Style Tray (which represents all properties of the selected object) onto the tool you want to change in the toolbar.

Friday, May 10, 2013

Pasting objects to their copied location

One of the things that drives people nuts about Omnigraffle is its insistance on pasting an object to a different location from where it was copied.

The new location is usually offset from the original location by a horizontal/vertical distance equal to the grid size,  but sometimes - especially when pasting to a different canvas - it lands at a seemingly random location altogether.

There is an easy workaround. Instead of pressing Command+V to paste, press Command+Shift+V. This always pastes to the copied location, whether on the same canvas or a different canvas.

Once you learn this, you will never press Command+V without Shift again.

Resizing text when resizing objects

When Omnigraffle objects resize, the font size remains the same. Take a rectangle with Helvetica 13 as its font and resize it from 500x500 to 100x100, and the font will still be Helvetica 13. Usually, this is desired, but sometimes, it is not.

When it's not desired, resizing a large group with various different font sizes requires tedious, manual resizing of the fonts.

But there's a better way. A powerful feature of Omnigraffle is the ability to freely convert any object into a PDF object without losing the ability to edit it fully in Omnigraffle. And when PDF objects resize, their text resizes proportionally.

Below is a wireframe that has certain elements that you want to call attention to in the notation at the right. These elements were created at full size.


Having the called-out objects at full size takes up room needed for description, and sizing down the Omnigraffle group has the font problem mentioned above. So to create scaled-down versions with the text properly scaled, select the desired group or set of objects, and from the menu choose:

Edit > Copy As > PDF

This puts a copy of the Omnigraffle objects on the clipboard as a PDF object. Then, it's just a matter of pasting and resizing the PDF object. (You can also crop this image. See the post Masking and cropping cmages.)

Plus, you're not stuck with a static PDF: the object remains fully editable in Omnigraffle as native Omnigraffle objects. To edit the object, select it and choose from the menu:

Edit > Edit in Omnigraffle. (Or just double click it.)

This opens an Omnigraffle window that's a link-back instance to the PDF object in the document. Here you can edit whichever elements you want as native Omnigraffle objects and choose Save to update the PDF object.

Or, if your goal is to convert the PDF back into native Omnigraffle objects, you can simply copy all of the Omnigraffle objects out of this link-back instance, and paste them into your original document. Note that, however, these objects will be restored to their original size, regardless of how the PDF object was sized.